
Using the “Get Ready for Conferences” Guide
The short version:
The guide is designed to walk you through the setup process in steps. To access the guide:
- Log in to your school's MyConferenceTime account as an admin.
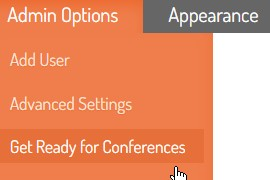
- Go to Admin Options > Get Ready for Conferences.
- Follow the steps.
The long version:
The Get Ready for Conferences guide walks you through preparing your school for parent-teacher conferences. It helps you review staff information, create conference schedules, and check your setup before inviting parents to sign up.
You can work through the guide at your own pace. You do not need to finish everything in one sitting.
Before you begin
Log in to your school’s MyConferenceTime account using an administrator account.
Have the following information available:
- Conference dates and start and end times.
- The length of each appointment—for example, 15 minutes.
- Any breaks teachers will need.
- A list of participating staff and their email addresses.
- The date and time parents should be able to begin signing up.
- Any instructions parents need about locations or virtual meetings.
In MyConferenceTime:
- A schedule is a teacher’s conference signup page.
- Time slots are the individual appointments parents can reserve.
- A staff account allows a staff member to log in to your school’s MyConferenceTime account. Every teacher who needs a conference schedule must have a staff account. Staff members can also have accounts without schedules. For example, school administrators and school counselors may need to log in to manage conferences or view information, even if they do not hold conferences themselves.
1. Open the guide
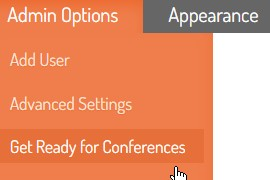
From the Admin Options menu, click Get Ready for Conferences.
Choose the guide that fits your school:
- First round of conferences: Use the new-school guide if your school is getting started with MyConferenceTime.
- Another round of conferences: Use the returning-school guide if your school has used MyConferenceTime before—even if this is your first time managing the account.
MyConferenceTime may recommend a guide based on the information already in your school’s account. You can choose the other guide if it fits better.
If someone has already started the guide, click Resume guide to continue.
2. Learn how to move through the guide
Each step explains what to review and provides buttons that take you to the appropriate page.
Follow this routine:
- Read the instructions for the step.
- Click the button for the task you need to complete.
- Make and save your changes on that page.
- Click Return to setup guide in the banner to come back.
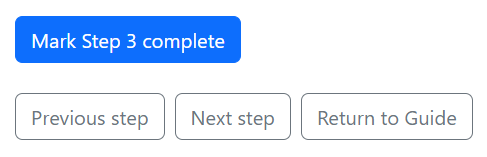
- Click Mark Step [number] complete when you have finished reviewing the step.
The number on the completion button changes to match the step you are viewing.
Marking a step complete records your progress. You must still save any changes on the page where you make them.
You can also use:
- Previous step to go back.
- Next step to move forward without marking the current step complete.
- Return to Guide to see the full checklist.
- Mark as incomplete if a completed step needs more work.
If nothing needs changing, you can still mark the step complete after reviewing it. Some steps offer a No, continue button for this purpose.
3. Review previous schedules
Returning schools only
Decide what to do with schedules from earlier conferences.
| Option | What it does |
|---|---|
| Keep all existing schedules as-is and continue | Leaves the schedules unchanged. |
| Make all schedules not visible | Hides all existing schedules from parents while keeping their time slots and registrations. |
| Make selected schedules not visible | Lets you choose which schedules to hide. |
| Delete selected schedules | Lets you choose which schedules to remove. |
| Delete all schedules | Removes all existing schedules and their time slots and registrations from use. Staff accounts remain. |
Check carefully before choosing an “all schedules” option. It includes upcoming schedules as well as old ones.
If you need to keep records from previous conferences, save those records before deleting schedules.
To hide or delete only certain schedules, follow the guide’s link to Schedule Summary, select the appropriate schedules, and follow the instructions shown.
If you are unsure whether schedules should be deleted, pause this step and check with the person responsible for conferences at your school.
4. Remove staff who have left
Returning schools only
Review whether anyone listed in your account has left the school.
- If everyone should remain, click No, continue.
- If staff need to be removed, click Yes, choose staff.
Select only the people who should be removed, then click Review selected staff for removal. Read the confirmation carefully before proceeding.
Removing a staff member also removes their owned schedules, including the associated time slots and registrations. Save any records you need first.
Your own account and protected accounts cannot be selected.
5. Add or update staff
Make sure everyone who will hold conferences has a staff account.
If changes are needed, click Yes, add or edit staff.
You can:
- Click Upload staff list to add staff from a spreadsheet.
- Use the link to add a staff member directly on the website.
- Click Open Staff Summary, then use edit beside a person’s name to update their information.
Check names, email addresses, rooms, grade levels, and other details your school uses.
Adding a staff account does not create a conference schedule. You will create schedules in a later step.
When finished, return to the guide and mark the step complete. If the staff list is already correct, click No, continue.
If the guide says staff management is unavailable for your account, contact MyConferenceTime support for assistance.
6. Review virtual meeting links and extra information
Returning schools only
Review any information saved with staff accounts, such as virtual meeting links or additional instructions.
Remove outdated information only where needed. For example, a virtual meeting link from last year may need to be replaced or cleared.
Read the confirmation before clearing information. If the information is already correct, leave it in place.
Also check any signup questions about virtual or telephone conferences. Update questions that no longer apply.
7. Create conference schedules
Click Open Conference Setup Wizard.
The wizard helps you create conference dates and appointment times for participating staff.
Use the conference details you gathered before starting. Check:
- Which staff members need schedules.
- Conference dates.
- Start and end times.
- Appointment length.
- Breaks between appointments.
If you need help, click Directions for using the Conference Setup Wizard in the guide.
After creating the schedules, review them and make any individual adjustments needed. Then click Return to setup guide and mark the step complete.
8. Review your school’s settings
Use the Advanced Settings buttons to review:
- Time zone: Make sure it matches your school’s location.
- Conference booking limits: Check any limits on how many conferences parents may reserve.
If you change a setting, save it before returning to the guide.
If the settings are already correct, no changes are needed.
9. Customize the information parents will see
This step helps you prepare your school’s signup page.
Click Edit parent instructions to review the main comment. This is the message parents see on your school’s page.
Include clear information such as:
- Conference dates.
- When registration opens.
- How parents should sign up.
- Where conferences will take place.
- Any virtual meeting instructions.
- Who parents should contact for help.
Click Review signup fields to check the information parents are asked to enter when registering. Make sure the required and optional questions fit your school’s needs.
You can also click Update school logo to add or replace your school’s logo.
Save your changes, return to the guide, and mark the step complete.
10. Check that your school is ready
Click Run Readiness Checker.
The checker helps identify items that may need attention before parents register.
- Read the results.
- Correct any issues that apply to your school.
- Run the checker again after making corrections.
- Click Preview school page and review the page parents will use.
Confirm that the dates, staff schedules, and parent instructions are correct. Also check that schedules will be available to parents at the intended time.
An administrator’s view may differ from a parent’s view, so pay particular attention to schedule visibility and registration opening settings.
Return to the guide and mark this step complete after reviewing the results.
11. Let parents know when signup is ready
Completing the guide does not automatically open registration or send invitations to parents.
Confirm your registration opening settings, then notify families through your school’s usual communication methods, such as email, the school website, or social media.
For a starting point, select Letters to Parents from the Admin Options menu. You can customize a letter with instructions and your school’s MyConferenceTime link.
Stopping and returning later
Your completed-step checkmarks are saved for your school, so you or another school administrator can continue later.
To return:
- Log in to your school’s account.
- Open Admin Options → Get Ready for Conferences.
- Click Resume guide.
For a future round of conferences, you can use Restart the guide or Clear completed-step checkmarks to begin the checklist again. This clears the checkmarks; it does not delete staff or schedules.
If you see Saved progress is temporarily unavailable, you can still use the guide, but your completion checkmarks cannot be saved at that time.